Cloning an AWS CloudFront Distribution Easily

I’m often creating a new site that’s similar to others and has CloudFront in front of them (yes, think WordPress). Many of these distributions have a bunch of behaviors, and I hate to waste time trying to recreate them (copying and pasting, making sure I didn’t miss a step). Anyway, finally taking a little bit of time, I’ve found it’s straightforward to do it using the AWS CLI:

Steps to export, modify, and import a new CF config file with AWS cli:

  1. Install the CLI if you haven’t already. It’s relatively quick and straightforward, provided you have your access and secret keys. I’ve been using Version 2 of the CLI with great success. I’m primarily on Windows, so the below steps are respective of that.
  2. Using the CLI, export the CloudFront config of a distribution you want to copy. In my below example, you’ll need to swap out the distribution ID with one of your real distribution IDs (something like E3xxxxxxxxxx). Also, the c:\aws folder is whatever you want.

    aws2 cloudfront get-distribution-config --id YourDistID --output json > c:\aws\sourceCFconfig.json
  3. Take this json file, sourceCFconfig.json, copy it to a new file, newCFconfig.json.
  4. Open the new file, edit out the first parent element (be sure to remove the last curly bracket at the end of the file as well).
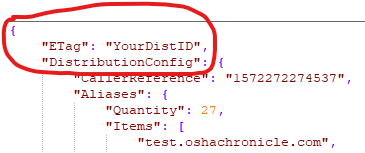
  5. Edit the Aliases to reflect your new site info (or remove if you’re not doing HTTPS).
  6. If you’re using a different origin for this distribution, change that as well, including in the behaviors (make use of find and replace)!
  7. Near the end of the doc, change the comment to something new:
  8. Change the ViewerCertificate to a valid certificate ARN (or remove if you’re not using HTTPS).
  9. Save this file you’ve been editing.
  10. Import this config and create a new distribution using the below command:

    aws2 cloudfront create-distribution --distribution-config file://c:\aws\newCFconfig.json

If no errors are shown, you should see a new distribution in CloudFront.

Cloning an AWS CloudFront Distribution Easily

How to Truncate / Trim Text By Sentence in JavaScript (not word or character)

Many times for showing a preview of longer text, I prefer not just to show a certain amount of characters (although it looks better visually) but to break it via sentence. Below is a small JavaScript function (I use it in NodeJs a bunch) that I’ve used to do this. No, it’s not the most complicated thing ever, but I wanted to share in case it helps anyone.

String.prototype.truncateBySent = function(sentCount = 3, moreText = "") {
  //match ".","!","?" - english ending sentence punctuation
  var sentences = this.match(/[^\.!\?]+[\.!\?]+/g);
  if (sentences) {
    console.log(sentences.length);
    if (sentences.length >= sentCount && sentences.length > sentCount) {
      //has enough sentences
      return sentences.slice(0, sentCount).join(" ") + moreText;
    }
  }
  //return full text if nothing else
  return this;
};

Easy to use, just do something like this:

someText.truncateBySent(2);

Sometimes you also want to include something at the end to indicate there is more text, like a link or ellipsis. You can do this:

someText.truncateBySent(2,' <a href="#">View More</a>');

It will take a line of text like this:

Sample sentence one? Another sentence two. Another three. Is there four? What about five? And six! Finally seven.

And return this:

Sample sentence one? Another sentence two. View More

See a working sample here: https://codepen.io/chrisbitting/pen/oNvzKNz

Or grab it on GitHub: https://github.com/cbitting/jsTruncateBySentence

How to Truncate / Trim Text By Sentence in JavaScript (not word or character)

Getting Fortnite XBox One & PC Crossplay to Work

Alright, so if you’re reading this, you’ve probably read some popular articles by some others (maybe major news sources) and didn’t get far. Getting Fortnite crossplay between PC & Xbox wasn’t that straightforward (at least for me), but in the end, works great. I’m trying not to do what the other articles did, and provide long, unhelpful paragraphs, so let’s get right to it. Below is what worked for me:

  1. I’m assuming you’re already playing Fortnite on the Xbox. You need to link your Xbox account to an Epic Games account. Do this by opening the browser (Edge) on the Xbox. Visit https://www.epicgames.com/fortnite. In the top-right, click the person icon, click Xbox.
  2. After clicking the Xbox button on the people menu, create a new account w/ an email address & password. (I couldn’t find an easy way to link an existing Epic account, so I just created a new one). Now you have an Epic games account linked to an Xbox live account.
  3. On a PC (or Mac) download the Epic Games Launcher. You can use the same PC that has a different account playing Fortnite already.
  4. On the PC in Epic games login to the account used to play on PC and send a friend request to the username of the Xbox user.
  5. Again on the PC, login into Epic games (you’ll need to logout of the PC user) and login as the Xbox account you created in step 2.
  6. Since you’re logged into the Xbox account (on PC) you can accept the friend request that was sent in step 4.
  7. You can now logout on the PC and login to a PC playing account (if you have one).
  8. On the Xbox, start a new party, on PC, your friends (that you accepted in step 6) can choose to play with you.
  9. And now win.
  10. Note: the first time you play w/ someone on PC via Xbox, you’ll be asked to confirm that crossplay is okay. Make sure you accept this.

Hope this helps someone out there.

Crossplay is pretty seamless, voice chat works – and now you’ve got more folks to help you win!


Getting Fortnite XBox One & PC Crossplay to Work

Convert MP4 Video to WEBM & OGV (OGG) using FFMPEG

If you use the html5 video element, you probably want to also include webm & ogv videos to help make your video more accessible on browsers. (I won’t get into using the element, but it’s fairly simple.) What I do want to share is an easy way to take our source video (maybe .mp4 or .mov) and convert it to .webm and .ogv. This solution uses the freely available FFMPEG – it’s been around forever, and many of the pay software “utilities” you could buy just use it in the background. Let’s get to it. Continue reading “Convert MP4 Video to WEBM & OGV (OGG) using FFMPEG”

Convert MP4 Video to WEBM & OGV (OGG) using FFMPEG

Spider / Download Website with Wget on Windows

Wget has been around forever it seems, but is still get great tool for spidering or downloading content (all content) from a website to your local machine. Below are some simple steps to install Wget and to run it.

To install Wget:

  1. Visit http://gnuwin32.sourceforge.net/packages/wget.htm and download the setup file, labeled “Complete package, except sources”.
  2. Run the setup .exe and leave everything as defaults.
  3. In a command prompt (cmd.exe) change to the C:\Program Files (x86)\GnuWin32\bin> directory (or C:\Program Files\GnuWin32\bin if your on a 32 bit OS)
  4. To test, if you just run wget.exe it should return wget: missing URL


To download a website:

  1. In a command prompt (cmd.exe) change to the C:\Program Files (x86)\GnuWin32\bin> directory (or C:\Program Files\GnuWin32\bin if your on a 32 bit OS)
  2. Now run:
    wget -e robots=off --no-check-certificate --recursive --level=0 -P "c:\\somefolder" http://chrisbitting.com

    (obviously replace my website with your own)

In that folder, you should soon files from the site Wget copied.

I’ve only had issues with a site that I had forced to use SSL. Wget didn’t like that.

Spider / Download Website with Wget on Windows

Creating a Chrome Plugin to Scrape A Page (using jQuery)

If you’ve played w/ Chrome extensions at all, you know they are super powerful. I recently wanted to visit a bunch of pages, and extract some info from each page. I could easily run some jQuery script in the console of each page to do this, but I wanted a quick and easy way to do this. Creating a Chrome extension, that includes jQuery, to run locally is pretty simple. Below are the different files (5 of them) you’ll need (put these all in a single folder).

After creating these and adding your code, add to Chrome by going to Extensions > Load unpacked extension and choose your folder.

1: manifest.json

{
 "name": "Your Extension Name",
 "description": "This was easy",
 "version": "1.1",
 "background": {
 "scripts": [ "jquery-3.1.1.min.js","background.js","content.js"]
 },
 "permissions": [
 "tabs", "http://*/*", "https://*/*"
 ],
 "browser_action": {
 "default_title": "My Extension Title",
 "default_icon": "a-cool-logo.png"
 },
 "manifest_version": 1
}

2: jquery-3.1.1.min.js (get a copy from jquery.com)


3: a-cool-logo.png (16px x 16px)


4: background.js

chrome.browserAction.onClicked.addListener(function(tab) {
 chrome.extension.getBackgroundPage().console.log('your plugin gonna do something');
//maybe see if your plugin should be allowed to run
 if (tab.url.indexOf("/maybeCheckAurl/") !== -1) {
 
chrome.tabs.executeScript(null, { file: "jquery-3.1.1.min.js" }, function() {
 chrome.tabs.executeScript(null, { file: "content.js" });
});
 
 }
 
});

5: content.js (the magic happen here)

//i check to make sure jQuery is loaded
if (jQuery) { 
 
 jQuery(".someclass a").each( function() { 
 
//log the results 
 console.log($(this).attr("href"));

//maybe do something with them
 $.get( "http://yourapi"), function( data ) {});
 
 });
 
} else {
 alert('no jq');
}
Creating a Chrome Plugin to Scrape A Page (using jQuery)

Accessing the Cloudflare API in C#

shutterstock_328592903Cloudflare provides security, CDN and more for your websites. If you’re using the Cloudflare caching to speed up your sites (it really is fast) you may want to purge their cache from your application (instead of waiting X days). Cloudflare provides an API that seems to offer everything you’d possible need. I wanted to do this from c#, but did’t find any great libraries or code that was using their newest API (v4).

Below is some quick simple code that I’ve found to work great so far for me. It’s pretty basic, and doesn’t require many external libraries (just JSON.net). Let me know your thoughts and if it helps you.

//define somethings we'll need for the api
string apiEndpoint = "https://api.cloudflare.com/client/v4";

//user info here
string userEmail = "youremail@something.com";

//this is your Global api key found in "my account"
string userAPIkey = "xxxxxxxxxxxxxxxxxxxxxxxxx";

//domain your working with:
string domain = "http://www.yourdomain.com";

//let's get our zone ID (we'll need this for other requests
HttpWebRequest request = WebRequest.CreateHttp(apiEndpoint + "/zones?name=" + domain + "/&status=active&page=1&per_page=20&order=status&direction=desc&match=all");
request.Method = "Get";
request.ContentType = "application/json";
request.Headers.Add("X-Auth-Email", userEmail);
request.Headers.Add("X-Auth-Key", userAPIkey);

string srZoneResult = "";
using (WebResponse response = request.GetResponse())
using (var streamReader = new StreamReader(response.GetResponseStream()))

	srZoneResult = (streamReader.ReadToEnd());

dynamic zoneResult = JsonConvert.DeserializeObject(srZoneResult);

if (zoneResult.result != null)
{
	//get our zoneID
	string zoneId = zoneResult.result[0].id;

	//some pages to purge the cache on:
	byte[] data = Encoding.ASCII.GetBytes(@"{""files"":[""http://www.yourdomain.com/about/""]}");

	request = WebRequest.CreateHttp(apiEndpoint + "/zones/" + zoneId + "/purge_cache");
	request.Method = "DELETE";
	request.ContentType = "application/json";
	request.ContentLength = data.Length;

	request.Headers.Add("X-Auth-Email", userEmail);
	request.Headers.Add("X-Auth-Key", userAPIkey);

	using (Stream outStream = request.GetRequestStream())
	{
		outStream.Write(data, 0, data.Length);
		outStream.Flush();
	}

	string srPurgeResult = "";
	using (WebResponse response = request.GetResponse())
	using (var streamReader = new StreamReader(response.GetResponseStream()))

		srPurgeResult = (streamReader.ReadToEnd());

	dynamic purgeResult = JsonConvert.DeserializeObject(srPurgeResult);

	//was it a success (hopefully it = true)
	textBox1.Text = purgeResult.success;
}
Accessing the Cloudflare API in C#

Removing Bad (Spam) Traffic From Google Analytics

fake-spamIf you use Google Analytics, you’ve probably noticed in the past few months a ton of fake traffic in your website analytics. Traffic from referrals like social-buttons.com, best-seo-offer.com or 100dollars-seo.com (and other obviously legit sites). You’ll notice this traffic has a zero session view time and only visits the root of your site. Actually, “visits” isn’t even the correct term, because to my knowledge, these site are just loading the Google Analytics javascript with your tracking code. I guess they believe it’s an easy way for people to see their site “giving” you traffic, then you visit them – and who knows what happens next.

Below are the steps I use to create a new segment in Google Analytics. You can use this segment instead of the “All Sessions” default.


1. Add a new segment:

1

2. Give it a name:

(I called mine “Real Traffic”, since I’m attempting to keep only actual user visit data).

2

3. Go to the “advanced” area to start adding:

3

4. Let’s add the first rule to remove data with blank hostnames:

Make sure Sessions and Include is set, then select Hostname and Matches Regex. We’re including multiple domains (your domain and others you want to include (like webcache.googleusercontent.com). Be sure to add your domain to this list! Note: the “|.*” is RegEx for and + starts with.

4

5. Second and last rule:

Now the second rule has 2 conditions and is removing the other part of the bad / spam data using referral sources. This is where the action happens and starts to really clean the bad fake traffic. Make sure to set Sessions to Exclude, and use “and” in between the two parts of the condition.

5


That should be it. Save your segment and see if it makes a difference. I prefer this method over filters since it doesn’t remove any data.

In some of my test sites, I’m finding 96% of the traffic is fake (below is a comparison).

ga-sample


For reference, here are the sites I’ve found so far to be junk and I’m excluding:

social-buttons.com
simple-share-buttons.com
free-share-buttons.com
free-social-buttons.com
event-tracking.com
Get-Free-Traffic-Now.com
buttons-for-website.com
semalt.com
best-seo-offer.com
best-seo-solution.com
buttons-for-your-website.com
makemoneyonline.com
100dollars-seo.com
dailyrank.net

Edit 7/15 - 2 more additions to add:
success-seo.com
videos-for-your-business.com

Edit 8/3 - another awesome referrer:
yourserverisdown.com

Removing Bad (Spam) Traffic From Google Analytics

Force WWW & Fix Redundant Hostnames on Google / SEO

I feel the term “SEO” is completely overused, however, there are a few things you want to do besides just having great content. One is make sure your site url is consistent. chrisbitting.com is different from http://www.chrisbitting.com. 

Google Analytics will provide you a suggestion to fix this if you’re experiencing traffic from multiple hostnames. Something like:

Property http://www.yourdomain.com is receiving data from redundant hostnames. Some of the redundant hostnames are:

This is easy to fix using your Global.asax page. Just add this to your code, replacing “yourdomain” with your actual domain. The Application_BeginRequest will catch and redirect to the altered url, also issuing a 301 to help search engines.

void Application_BeginRequest(object sender, EventArgs e)
    {
        

        if (HttpContext.Current.Request.Url.ToString().ToLower().Contains(

            "http://yourdomain.com"))
        {

            HttpContext.Current.Response.Status = "301 Moved Permanently";

            HttpContext.Current.Response.AddHeader("Location",

                HttpContext.Current.Request.Url.AbsoluteUri.ToString().ToLower().Replace(

                    "http://yourdomain.com", "http://www.yourdomain.com"));

            HttpContext.Current.Response.End();
        }
    }

You could do this using web.config + rewrite, but I enjoy this method more.

Force WWW & Fix Redundant Hostnames on Google / SEO

Creating a copy of your website using GNU Wget for Windows or OS X

There are times when you want to have a copy of your site (the frontend / user side). GNU Wget has been around a long time, but in my opinion, it’s still a great tool to backup / mirror websites.

Wget has many options and parameters, of which I won’t even scratch the surface, but below are the simple steps to get Wget setup and running on Windows and OSX machines. Wget is a command line utility, so it might appear overwhelming, but don’t worry, it’s cake!

Windows steps:

Step 1. Download / install Wget. Visit http://gnuwin32.sourceforge.net/packages/wget.htm and choose to download the Setup labeled “Complete package, except sources.”

Step 2. After installation is finished, open a command prompt (cmd.exe).

Step 3. Go to your GNU application folder (on 64 bit it’s in C:\Program Files (x86)\GnuWin32\bin, on 32 bit, it’s probably in C:\Program Files\GnuWin32\bin).

Step 4. To test if wget is installed correctly, run “wget -V“. It should return the current version and some credit. If not, revisit previous steps.

Step 5. To download / mirror a site, run  wget -e robots=off -r -l 0 -P “c:\\temp” http://www.chrisbitting.com – replacing “c:\temp” with the folder you want the site files to download to and “chrisbitting.com” with your site address.

wget_pc


You should now see the command prompt update with the progress – depending on the size of your site – it may take some time to download everything. After it’s finished, your directory should contact a mirror of your site, including html, css, images, etc.


Apple OS X steps:

Step 1. Open a blank terminal.

Step 2. Install homebrew by running:

ruby -e “$(curl -fsSL https://raw.github.com/Homebrew/homebrew/go/install)”

Step 3. After installing brew (and entering your password), run:

brew doctor

Step 4. Now install Wget using:

brew install wget

Step 5. When installation finishes, run “wget -V” to ensure Wget installed correctly. It should return the current version and some credit. If not, revisit previous steps.

Step 6. To download / mirror a site, run  wget -e robots=off -r -l 0 -P “/temp” http://www.chrisbitting.com – replacing “/temp” with the folder you want the site files to download to and “chrisbitting.com” with your site address.

wget_osx

You should now see the terminal update with the progress – depending on the size of your site – it may take some time to download everything. After it’s finished, your folder should contact a mirror of your site, including html, css, images, etc.

To see the multitude of options Wget provides, run “wget –help“. Happy downloading!


Creating a copy of your website using GNU Wget for Windows or OS X