Increase IIS Logs to SQL Log Parser Import Performance w/ transactionRowCount

A few years ago I showed how to use Microsoft’s Log Parser tool to take IIS log files and import into a SQL database.

From Microsoft: Log parser is a powerful, versatile tool that provides universal query access to text-based data such as log files, XML files and CSV files, as well as key data sources on the Windows® operating system such as the Event Log, the Registry, the file system, and Active Directory®. You tell Log Parser what information you need and how you want it processed. The results of your query can be custom-formatted in text based output, or they can be persisted to more specialty targets like SQL, SYSLOG, or a chart.

In short, using something like this to take IIS logs and dump into a new SQL table:

C:\Program Files (x86)\Log Parser 2.2>logparser “SELECT * INTO iisLogs FROM c:\temp\logs\*.log ” -i:iisw3c -o:SQL -server:localhost -database:webLogs -username:sa -password:yourpass -createTable: ON

But, if you’re importing tons of records, it might seem to take a while. BUT: you can use the option “transactionRowCount” to gain some performance. The transactionRowCount option determines how many rows are included in each transaction. By default, transactionRowCount is 1, so after every row, the transaction is committed. If you set it to “-1” it will include everything in 1 large transaction.

Test Results

Below a did a few tests. My test included 36,000,000 rows. Continue reading “Increase IIS Logs to SQL Log Parser Import Performance w/ transactionRowCount”

Increase IIS Logs to SQL Log Parser Import Performance w/ transactionRowCount

Error 500.19 with IIS / rewrite in web.config

500-19
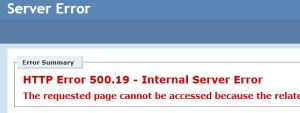
If you’ve added a rewrite to you web.config but are now receiving a HTTP Error 500.19 Internal Server Error, chances are you need to install the URL Rewrite Module. You might have assumed this is part of your install but it might be missing.

The install only takes a few seconds.


  1. Visit http://www.iis.net/downloads/microsoft/url-rewrite
  2. At the bottom of the page you can download the installer without using Web Platform.
  3. Run the MSI installer to add the URL Rewrite Module to your server. In my experience, I have not needed to reboot or reset IIS after installing this.
  4. Now you should successfully be able to use <rewrite>.

rewrite-mod

Error 500.19 with IIS / rewrite in web.config

IIS / WordPress – Blocking User Agents using Rewrite Rules

wp_logo

If you run WordPress on Windows (and who doesn’t?) and have the need to block specific user agents (bots, crawlers, browsers) below is a decent way I’ve found that uses rewriting rules and works along side the needed WordPress rules:

Adding this rule to your web.config will block the request from the specified agent(s):

 <rule name="RequestBlockingRule1" stopProcessing="true">
          <match url=".*" />
          <conditions>
            <add input="{HTTP_USER_AGENT}" pattern="agent1|agent2|agent3" />
          </conditions>
          <action type="CustomResponse" statusCode="403"
             statusReason="Forbidden: Access is denied."
             statusDescription="You do not have permission to view this page." />
        </rule>

Continue reading “IIS / WordPress – Blocking User Agents using Rewrite Rules”

IIS / WordPress – Blocking User Agents using Rewrite Rules

IIS 8 ASP.Net Error “configuration section cannot be used…”

iis8logo
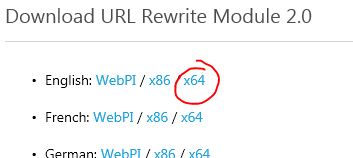
When working with IIS 8 (or even 7 or 7.5), you may have run across this little gem / error: “This configuration section cannot be used at this path”

HTTP Error 500.19 – Internal Server Error
The requested page cannot be accessed because the related configuration data for the page is invalid.
Module / Handler IIS Web Core
Notification BeginRequest
Handler Not yet determined

You’ll want to open the applicationhost.config located in: C:\Windows\System32\inetsrv\config

And now find the lines like this:

<section name="handlers" overrideModeDefault="Deny" />
<section name="modules" allowDefinition="MachineToApplication" overrideModeDefault="Deny" />

And change the Deny to Allow, like this:

<section name="handlers" overrideModeDefault="Allow" />
<section name="modules" allowDefinition="MachineToApplication" overrideModeDefault="Allow" />

Save the file, and you should be good!

IIS 8 ASP.Net Error “configuration section cannot be used…”

WordPress Multisite Windows / IIS Login Redirect / Loop Issue

wp_logoIf you have WordPress installed on Windows (2008 / IIS) with multisite + sub domains enabled you may have run into the issue of login loops / redirects when  accessing /wp-admin. Below are a few spots you may want to confirm you have the correct URLs:

In the database:

Table / Field

wp_blogs / domain
wp_options / siteurl
wp_options / home
wp_sitemeta / siteurl    (don't forget this one!)

Also check these tables in any additional sites (ie: wp_2_options).

Config Files
wp-config.php:

define('DOMAIN_CURRENT_SITE', 'www.yourdomain.com');

I also have this in my wp-config.php:

define('ADMIN_COOKIE_PATH', '/');
define('COOKIE_DOMAIN', '');
define('COOKIEPATH', '');
define('SITECOOKIEPATH', '');

Web Config
Below is my successful web.config

<?xml version="1.0" encoding="UTF-8"?>
<configuration>
  <system.webServer>
    <rewrite>
      <rules>
        <rule name="WordPress Rule 1" stopProcessing="true">
          <match url="^index\.php$" ignoreCase="false" />
          <action type="None" />
        </rule>
        <rule name="WordPress Rule 2" stopProcessing="true">
          <match url="^([_0-9a-zA-Z-]+/)?wp-admin$" ignoreCase="false" />
          <action type="Redirect" url="{R:1}wp-admin/" redirectType="Permanent" />
        </rule>
        <rule name="WordPress Rule 3" stopProcessing="true">
          <match url="^" ignoreCase="false" />
          <conditions logicalGrouping="MatchAny">
            <add input="{REQUEST_FILENAME}" matchType="IsFile" ignoreCase="false" />
            <add input="{REQUEST_FILENAME}" matchType="IsDirectory" ignoreCase="false" />
          </conditions>
          <action type="None" />
        </rule>
        <rule name="WordPress Rule 4" stopProcessing="true">
          <match url="^" ignoreCase="false" />
          <conditions logicalGrouping="MatchAny">
            <add input="{REQUEST_FILENAME}" matchType="IsFile" ignoreCase="false" />
            <add input="{REQUEST_FILENAME}" matchType="IsDirectory" ignoreCase="false" />
            <add input="{URL}" pattern="([a-zA-Z0-9\./_-]+)\.axd" />
          </conditions>
          <action type="None" />
        </rule>
        <rule name="WordPress Rule 5" stopProcessing="true">
          <match url="^[_0-9a-zA-Z-]+/(wp-(content|admin|includes).*)" ignoreCase="false" />
          <action type="Rewrite" url="{R:1}" />
        </rule>
        <rule name="WordPress Rule 6" stopProcessing="true">
          <match url="." ignoreCase="false" />
          <action type="Rewrite" url="index.php" />
        </rule>
      </rules>
    </rewrite>
    <httpRedirect enabled="false" destination="http://www.yourdomain.com" />
  </system.webServer>
</configuration>
WordPress Multisite Windows / IIS Login Redirect / Loop Issue

Setting up port forwarding in VMWare Workstation 8

To setup port forwarding (maybe you have IIS or Apache running in a VM and want to access from other machines or the host).

If you vm is setup with NAT like this:

…You can go to “Edit > Virtual Network Editor”, this brings up this:

If you choose “NAT” network type, and click “NAT Settings”, you can configure port forwarding like this:

Enter your port, VM IP, etc. Click “OK” a bunch of times and you should be good. Don’t forget about firewalls on the host and VM.


Setting up port forwarding in VMWare Workstation 8

Importing IIS Logs into a SQL Database / Table

1. Download the Log Parser tool from Microsoft here. I know, it’s old but works great.

2. Dump your IIS log files somewhere (ie: c:\temp\logs).

3. Run this in cmd:

C:\Program Files (x86)\Log Parser 2.2>logparser “SELECT * INTO iisLogs FROM c:\temp\logs\*.log ” -i:iisw3c -o:SQL -server:localhost -database:webLogs -username:sa -password:yourpass -createTable: ON

if you’re on 32bit, run Log Parser will be in this folder:

C:\Program Files\Log Parser 2.2>logparser “SELECT * INTO iisLogs FROM c:\temp\logs\*.log ” -i:iisw3c -o:SQL -server:localhost -database:webLogs -username:sa -password:yourpass -createTable: ON

Now you have a table w/ tons of data!

Update:

In an updated article, I discuss increasing import performance the transactionRowCount option.

Importing IIS Logs into a SQL Database / Table